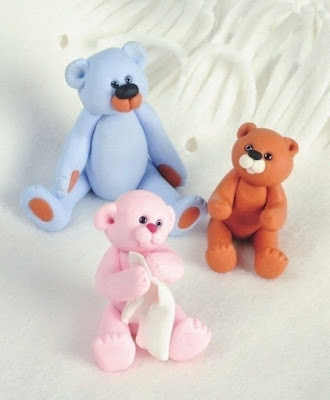
These lovely little bears are a lot easier to make than you may think and with these easy to follow tutorials from some fantastic crafters you will be sculpting in no time. Any of these lovely little bears would be great as cake toppers or gift ideas to add to any teddy bear collection.
Showing posts with label crafts for adults. Show all posts
Showing posts with label crafts for adults. Show all posts
Saturday, 21 May 2016
Cute Clay Bear Tutorials
Here are some more great clay craft ideas that I have discovered over the years. This time I thought I would share some cute clay Teddy Bear tutorials that can be made from a variety of clays, including polymer clay and air dry clay.
These lovely little bears are a lot easier to make than you may think and with these easy to follow tutorials from some fantastic crafters you will be sculpting in no time. Any of these lovely little bears would be great as cake toppers or gift ideas to add to any teddy bear collection.
These lovely little bears are a lot easier to make than you may think and with these easy to follow tutorials from some fantastic crafters you will be sculpting in no time. Any of these lovely little bears would be great as cake toppers or gift ideas to add to any teddy bear collection.
Wednesday, 11 May 2016
Clay Flower Tutorials
Now that I have posted quite a few techniques about working with polymer and air dry clay I thought it was about time I shared some really useful and inspirational tutorials I have found over the years.
I will start my tutorials share with techniques for creating handmade polymer clay and air dry clay flowers. Some of these beautiful creations are so realistic it is hard to distinguish from the real thing. You will also notice that some of the tutorials are from cake decoration sites but the techniques for sugar craft are nearly all the same as clay crafts so is very easy to adapt the tutorials to clay.
I will start my tutorials share with techniques for creating handmade polymer clay and air dry clay flowers. Some of these beautiful creations are so realistic it is hard to distinguish from the real thing. You will also notice that some of the tutorials are from cake decoration sites but the techniques for sugar craft are nearly all the same as clay crafts so is very easy to adapt the tutorials to clay.
Thursday, 28 April 2016
Essesntial clay tools
the right track. Thanks to the web you can search for hours to find the right tools but will soon get overwhelmed by the huge range of products available. There are tools that cut, shape, roll, texture, mould, carve and so on, but how will you know which tools are essential and which you can cope without, to begin with.
I thought I would make it a bit easier for you, by listing a few tools that you will find invaluable during the early days of your clay crafting experience.
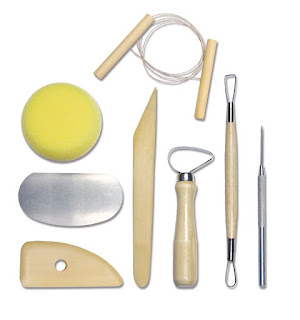
If you want to buy some dedicated tools then there are loads of great tools available . To start with I found a very reasonable pack of sculpting tools like the ones in the picture below, at Amazon. I only paid a few pounds for the pack but if you are going to get serious about clay then it is worth remembering that your tools will be used a lot and the cheaper versions don't last forever.
Pottery Tool Set
This 8 Piece Pottery Tool Set has traditionally been used for pottery projects, but it also has unique applications for oven-bake and air dry clay. The tools are perfect for cutting, shaping, sculpting and detailing both types of clay before curing.
 |
| CLICK TO SEE POTTERY TOOLS |
Wednesday, 11 November 2015
Colouring Clay
Many clay products such as polymer and foam clay can be purchased pre-coloured. Stone based air dry clay’s are usually white, grey or terracotta. If you want to colour your clay there are two main techniques;
- Pre- cured - wet clay
- Post cured - dry clay
There are an abundance of pigments that can be used to add colour and shimmer to your creations. In addition to using tempura and acrylic paints, air dry clay can be coloured with marker pens, inks, chalks and dyes. Glitter glue and metallic powders can also be added for extra sparkle and great effects. Remember that air dry clay is porous and the finished creation should be sealed with a varnish.
Before adding a colourant to uncured clay knead the clay to soften it making it easier to accept the colour. Gradually add the colourant a small drop at a time, making sure you work it in fully before adding more. Continue adding a few drops at a time until you are satisfied with the shade. Colouring clay can be very messy so be sure to work over a surface that can be easily cleaned or thrown away, such as plastic sheeting or newspaper.
Wednesday, 16 September 2015
Glazing and Varnishing Clay Creations
There are many different brands including Fimo, Sculpey, Gedeo and many others, which all offer different finishes for your clay work. Some leave a matt finish others a satin finish and others a glossy finish. Not to mention the different sizes and prices of each product. If you use the wrong type of varnish the finish may look fine to start with but could soon start to peel or become sticky later. Others may start yellowing or cause the paint or clay to react and loose the colouring.
Thursday, 3 September 2015
Clay Work With Cold Porcelain
Cold Porcelain is similar to most air dry clay’s and is great for
making different clay projects, especially flower sculptures, jewellery,
figurines and cake toppers. It is also great to use with moulds as it retains
fine detail and is easy to remove from the mould. It is now becoming more and
more popular with professional clay artists and craft people. It is also a great craft clay to use for beginners for their clay art projects.
This
clay is perfect for making delicate flowers and petal sculptures as it can be
stretched and rolled extremely thin, which results in very realistic looking
floral effects.
Sunday, 23 August 2015
Clay Work with Oven Hardening Clay
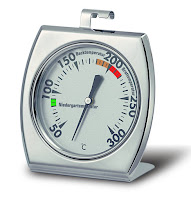
Polymer clay's are oil-based and therefore must be heated to cure, however, a home oven can be used and a kiln is not required. The baking process varies with each brand so it is always important to check the packaging instructions for each clay. To give you a rough idea, Fimo recommend you bake the clay at 110*C/230*F for 30 minutes. This will also depend on the size and thickness of the clay creation.
 |
| Oven Thermometers Click for more |
takes at least 24 hours to dry. Polymer clay will be plastic like, waterproof and very durable if cured properly. Polymer clay does not harden completely until it is cool so will feel soft to touch when it is taken out of the oven.
Another positive factor for oven baked clay is that it comes in a wide range of colours and effects. This is great if you don't want to paint your creations or you are making a specific creation that needs a certain surface effect such as marbling or granite. If you do want to paint the clay after it has been baked then acrylic paints are one of the best to use, although your clay creation will need to be varnished once the paints dry, in order to protect it.
Friday, 21 August 2015
Clay Work With Air Dry Clay
Unlike traditional clay's that need to be fired in a kiln at a high temperature, or polymer clay's that need to be cured in an oven air dry clay is a mainly water based, which is simply clay mixed with water. It therefore cures in the open air at room temperature, so must be kept in an air tight container when not in use. It is usually inexpensive and it is generally very easy to use and pliable.
Subscribe to:
Posts (Atom)


